Introduction To Homemade Rye Bread And Its Flavors

Homemade rye bread is a delicious and wholesome alternative to traditional white or whole-wheat bread. It offers a unique flavor profile that adds depth and complexity to any sandwich or toast. Rye flour, derived from the rye grain, gives the bread its distinct taste and texture. Adding caraway seeds further enhances the flavor, providing a subtle hint of earthiness.
Making homemade rye bread is not as daunting as it may seem. It follows the same basic steps as making any other type of loaf. Begin by proofing your yeast in warm water with a touch of honey to activate it. Then, combine the yeast mixture with salt, different types of flour (including rye), and caraway seeds. Knead the dough until it becomes smooth and elastic before allowing it to rise.
The flavors in homemade rye bread will surely delight your taste buds and add variety to your family’s meals. The combination of nutty rye flavor with hints of sweetness from honey creates a uniquely satisfying experience.
Furthermore, introducing your family to new flavors through homemade bread can be an enjoyable culinary adventure for all ages. It encourages exploration and expands their palates beyond what they may be accustomed to.
In the next sections, we will explore the necessary ingredients and equipment needed for this recipe, provide step-by-step instructions on how to make homemade rye bread, offer tips for kneading and proofing the dough effectively, suggest serving ideas for enjoying this flavorful loaf, discuss the benefits of making your bread at home, and ultimately encourage you to embark on this delightful baking journey with your loved ones.


Ingredients And Equipment Needed For The Recipe
You will need key ingredients and basic equipment to make homemade rye bread. Here is a list of what you will need:
Ingredients:
– Cups of unbleached bread flour (such as King Arthur®)
– Cup of dark rye flour
– Tablespoons of dry potato flakes
– Caraway seeds
– 1 ½ tablespoons of demerara sugar
– 2 ½ teaspoons of instant yeast
– Sea salt
– Warm water
– ¼ cup of canola oil
– Sour pickle juice
Equipment:
– Large stand mixer with the paddle attachment (or you can mix by hand)
– Mixing bowls for proofing the dough
– Plastic wrap or kitchen towel to cover the dough while it rises
- Loaf pan for baking the bread
- Cooling rack to cool the bread after baking
Having these ingredients and equipment ready before starting will ensure a smooth and efficient baking process. The stand mixer makes mixing and kneading the dough easier, but you can mix and knead by hand if you don’t have one.
Remember that using high-quality ingredients like fresh flour and caraway seeds will enhance the flavor of your homemade rye bread. And don’t forget about the sour pickle juice! It may seem unusual, but it adds a tangy note that pairs perfectly with rye.
Now that we have everything we need let’s proceed to the step-by-step instructions for making homemade rye bread.
Step-by-step Instructions On How To Make Homemade Rye Bread
To make homemade rye bread, follow these step-by-step instructions:
- In a large mixing bowl, combine 2 cups of unbleached bread flour, 1 cup of dark rye flour, two tablespoons of dry potato flakes, 1 tablespoon of caraway seeds, 1 ½ tablespoons of demerara sugar, 2 ½ teaspoons of instant yeast, and one teaspoon of sea salt.
- Mix 1 cup of warm water and ¼ cup of canola oil in another bowl or measuring cup. Add the wet and dry ingredients and stir until a shaggy dough forms.
- Once the dough comes together, transfer it to a lightly floured surface and knead for about 10 minutes until it becomes smooth and elastic.
- Place the dough in a greased bowl and cover it with plastic wrap or a kitchen towel. Let it rise in a warm place for about one hour or until it doubles in size.
- Punch it down after the dough has risen to release any air bubbles. Shape it into a loaf by rolling it tightly from one end to the other.
- Grease a loaf pan and place the shaped dough inside. Cover again with plastic wrap or a kitchen towel and let it rise for another hour until puffy.
- Preheat the oven to 375°F (190°C). Bake the bread for 30-35 minutes until it is golden brown.
- Remove the bread from the oven and let it cool in the pan for about five minutes before transferring to a cooling rack.
- Once completely cooled, slice your homemade rye bread and enjoy!
Follow these steps carefully for delicious homemade rye bread to impress your family and friends!
Tips For Kneading And Proofing The Dough

Kneading and proofing the dough are crucial steps that can greatly affect the final result when making homemade rye bread. Here are some tips to ensure success:
- Kneading Technique: When kneading the dough, use the heel of your hands to push and stretch it away from you, then fold it back towards you. Repeat this motion for 10 minutes until the dough becomes smooth and elastic. This helps develop gluten, giving the bread a light and airy texture.
- Consistency of Dough: Rye flour absorbs more liquid than regular bread flour, so be prepared to adjust the amount of water or flour accordingly. The dough should be slightly sticky but still manageable. If it’s too dry, add a tablespoon of water at a time; if it’s too wet, sprinkle in some additional flour.
- Proofing Time: Rye bread benefits from a longer proofing time than other bread types. Letting the dough rise slowly allows flavors to develop and gives the bread its distinct tangy taste. After shaping the loaf, cover it with plastic wrap or a kitchen towel and let it rise in a warm place for about an hour or until puffy.
- Oven Spring: Preheat your oven properly before baking to achieve a nice rise in the oven (known as oven spring). Ensure the recipe’s desired temperature before placing your loaf inside.
- Cooling and Slicing: Once baked, resist immediately slicing into your freshly baked rye bread! Allow it to cool completely on a wire rack before slicing. This helps retain moisture and ensures even slices without squishing or tearing.
By following these tips for kneading and proofing your homemade rye bread dough, you’ll create loaves with perfect texture, flavor, and appearance every time!
Serving Suggestions And Ways To Enjoy Homemade Rye Bread
There are countless ways to enjoy homemade rye bread. Its distinct flavor and hearty texture make it a versatile bread that can be enjoyed in various ways. Here are some serving suggestions to inspire you:
- Classic Sandwiches: Rye bread is perfect for building delicious sandwiches. Layer it with your favorite deli meats, cheeses, and condiments for a satisfying meal.
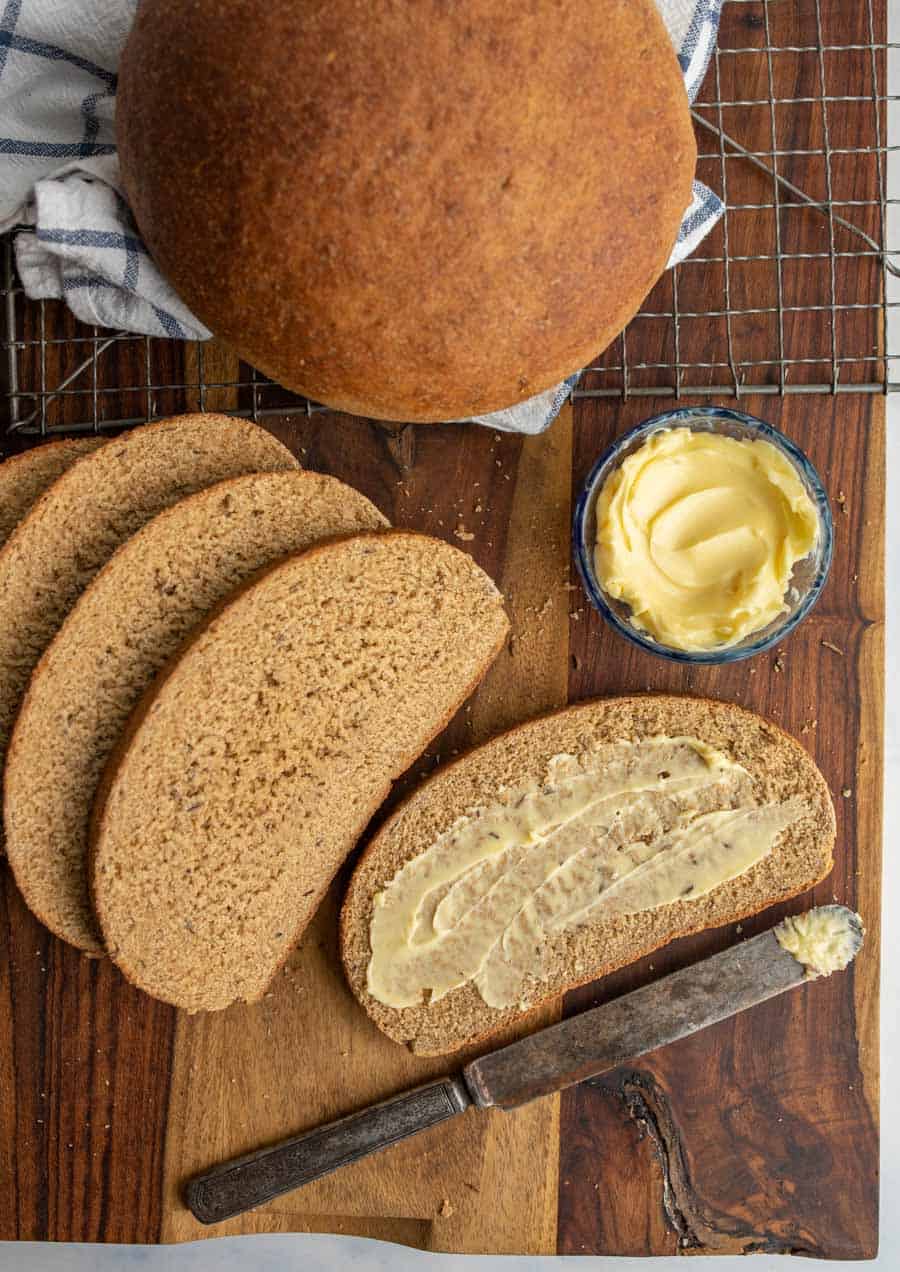
- Toasted with Butter or Jam: Toasting slices of rye bread brings out its nutty flavor and adds a delightful crunch. Spread butter or your favorite jam for a tasty breakfast or snack.
- Open-Faced Smørrebrød: Embrace the Scandinavian tradition of smørrebrød by topping slices of rye bread with an assortment of toppings such as smoked salmon, pickled herring, sliced cucumber, dill, and creamy spreads like cream cheese or mayonnaise.
- Bruschetta: Get creative and use rye bread as a base for bruschetta toppings like diced tomatoes, fresh basil, mozzarella cheese, and balsamic glaze.
- Croutons: Stale rye bread can be transformed into flavorful croutons for salads or soups by cutting it into cubes and baking until crispy.
- Avocado Toast: Mash ripe avocados onto toasted rye bread and sprinkle with sea salt and freshly ground black pepper for a trendy and nutritious breakfast.
Remember to store your homemade rye bread properly to maintain its freshness. Wrap it tightly in plastic wrap or place it in an airtight container at room temperature for up to three days.
Whether you enjoy it on its own or use it as the foundation for creative dishes, homemade rye bread will surely delight the whole family with new flavors!
Benefits Of Making Your Rye Bread At Home
Making your rye bread at home comes with a multitude of benefits that are worth considering. Here are some reasons why you should give it a try:
- Healthier Option: You have complete control over the ingredients used to make your rye bread. You can choose high-quality flours and organic ingredients and reduce or eliminate additives and preservatives commonly found in store-bought bread.
- Customization: Homemade rye bread allows you to customize the flavors and textures to suit your preferences. You can experiment with different ratios of rye flour to wheat flour, add various seeds or spices, and even incorporate other grains for added nutrition.
- Cost Savings: Baking your rye bread can save you money in the long run. The ingredients cost is often lower than buying specialty bread from a bakery or grocery store.
- Freshness: Nothing quite like the aroma and taste of freshly baked bread straight out of the oven. Homemade rye bread offers unmatched freshness that will elevate your dining experience.
- Skill Development: Making homemade rye bread is an opportunity to enhance your baking skills and learn new techniques. Each step provides a chance to grow as a home baker, from kneading and shaping the dough to perfecting the crust.
- Family Bonding: Baking together can create lasting memories while fostering teamwork and collaboration. It’s not just about enjoying delicious homemade rye bread; it’s about coming together in the kitchen and sharing quality time with loved ones.
- Environmental Consciousness: By making your rye bread, you reduce packaging waste of store-bought loaves.
- Sense of Accomplishment: Nothing beats the satisfaction of pulling a freshly baked loaf of homemade rye bread out of the oven, knowing that you made it yourself from scratch.
With these benefits in mind, don’t hesitate to embark on the journey of making your rye bread at home. The rewards are in the taste, quality, and joy and fulfillment of creating something delicious for yourself and your family.
Conclusion And Encouragement To Try Making Homemade Rye Bread For The Whole Family

In conclusion, making homemade rye bread is a rewarding and enjoyable experience with numerous benefits. Not only does it allow you to control the ingredients and customize the flavors to your liking, but it also saves you money in the long run and reduces packaging waste. The sense of accomplishment that comes with baking your bread is unmatched, and the freshness and aroma of a loaf straight out of the oven are irresistible.
We encourage you to gather your family in the kitchen and embark on this delicious journey together. Baking homemade rye bread can be a fun activity that brings everyone closer while fostering teamwork and collaboration. It’s an opportunity to create lasting memories while honing your baking skills.
To get started, follow our instructions using high-quality flour, yeast, water, salt, honey (or other sweeteners), and optional additions like caraway seeds or other spices. Knead the dough until smooth and elastic, then let it rise until doubled in size before shaping it into a loaf. Bake until golden brown, and enjoy!
Whether you slice it for sandwiches or toast it for breakfast with butter or jam, homemade rye bread is versatile enough to complement any meal or snack. Experiment with different toppings and fillings to discover new flavor combinations that suit your taste buds.
So why not unlock new flavors by making your rye bread at home? Your family will appreciate the fresh taste, wholesome ingredients, and love poured into each loaf. Start baking today and savor every bite of this delightful homemade treat!
FAQ About Unlock New Flavors: A Homemade Rye Bread Recipe For The Whole Family
Q: What makes homemade rye bread unique compared to store-bought bread?
A: Homemade rye bread offers a more tangy and sour flavor that can be customized according to individual taste preferences. It is also a great way to introduce new and unique flavors to your family.
Q: Are there any special techniques involved in making homemade rye bread?
A: Making homemade rye bread follows techniques similar to making other loaves. It involves proofing yeast, kneading in salt, and incorporating different flours and spices like caraway seeds for added flavor.
Q: How does homemade rye bread taste?
A: Homemade rye bread has a pleasantly tangy and sour flavor profile due to the mixture of bread and rye flour used in the recipe. It is also known for making excellent toast.
Q: Can homemade rye bread be a good option for family meals?
A: Homemade rye bread can be a great addition to family meals. It offers a unique flavor experience compared to traditional store-bought bread, and it can be a fun way to expand your family’s palate.
Q: Is homemade rye bread difficult to make?
A: While making homemade rye bread requires time and effort, it is not overly complicated. Following a simple recipe and basic bread-making techniques, you can easily create a delicious loaf of rye bread for your family.
Q: Can any variations be made to the basic rye bread recipe?
A: Yes, you can customize your homemade rye bread by adding other ingredients like seeds, nuts, or dried fruits to create different flavor profiles. Experimenting with these variations can make each loaf unique and tailored to your family’s preferences.

Andre Lotz immigrated to the United States from South Africa almost 20 years ago. Still, he didn’t feel truly at home until he settled in Mobile—a city that reminds him of his childhood home of Fish Hoek on the southern cape of Africa.